
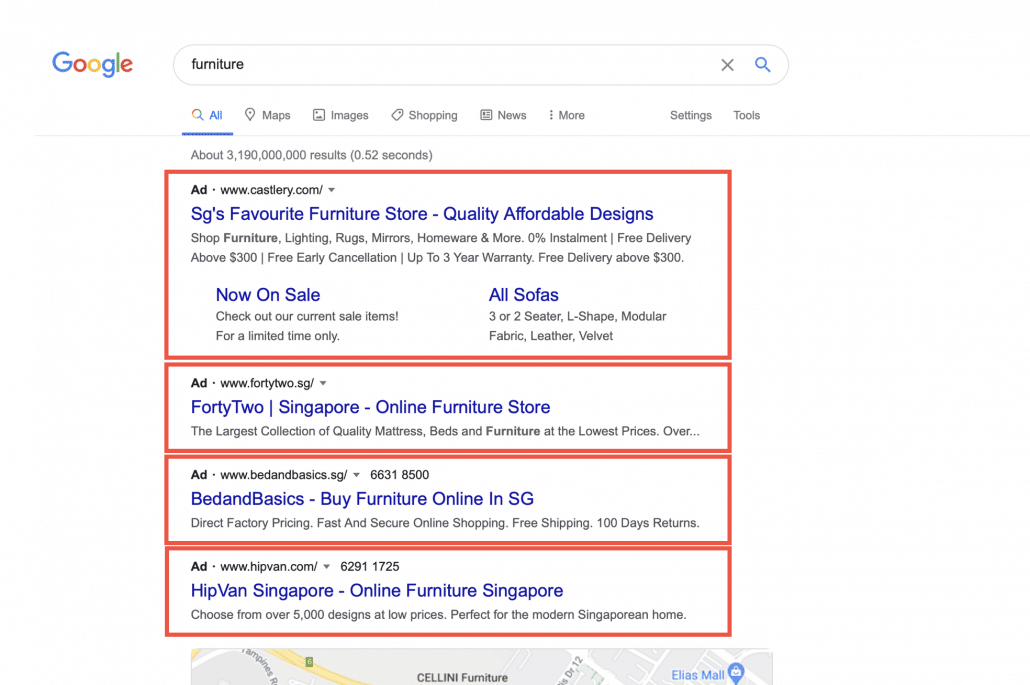
Have you ever wondered how brands are able to show up right at the top of the Google search results in the paid ads section?
From the fundamentals of Google Ads to the setting up of your Search campaigns, we will walk you through step-by-step in this article on how you can start advertising on Google Search right away.
Fundamentals of Google Ads
Before setting up a campaign, the most important thing would be to understand the fundamentals of Google Ads.
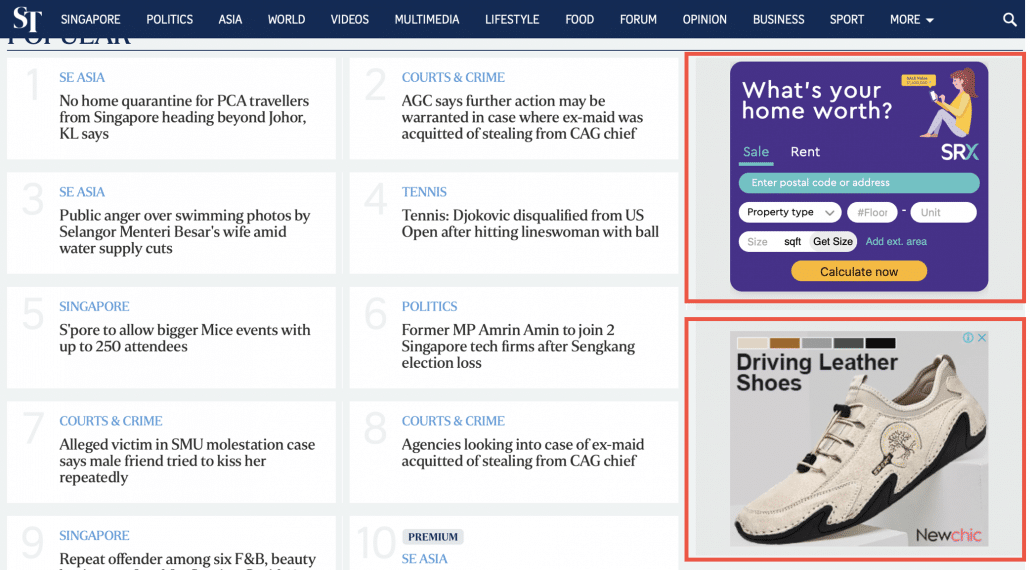
Defined as a term that embodies all the places where one’s Google Ads advertisements can appear, the Google Network is made up of two main networks – the Google Search Network and Display Network.
Why Advertise Through Google Ads?
There’s a reason why Google Ads, formerly known as Google Adwords, is a popular platform for companies to advertise their products and services.
What’s great about Google Ads is that not only are advertisers able to choose how much they want to spend and only pay when someone clicks on their ads; there’s also a low minimum amount of $1 per day that one has to pay for an ads campaign.
Google Ads also helps companies to reach consumers who are more likely to be interested in what they are advertising online by displaying the ads to users who are searching for a specific product or service. This in turn increases the chances of acquiring potential qualified customers.
Last but not least, advertising online means that one can analyze their click data as online campaigns are highly measurable, such as being able to track which ads are able to garner more clicks.
How does Google Ads work?
In case you have been wondering, this is how Google Ads work.
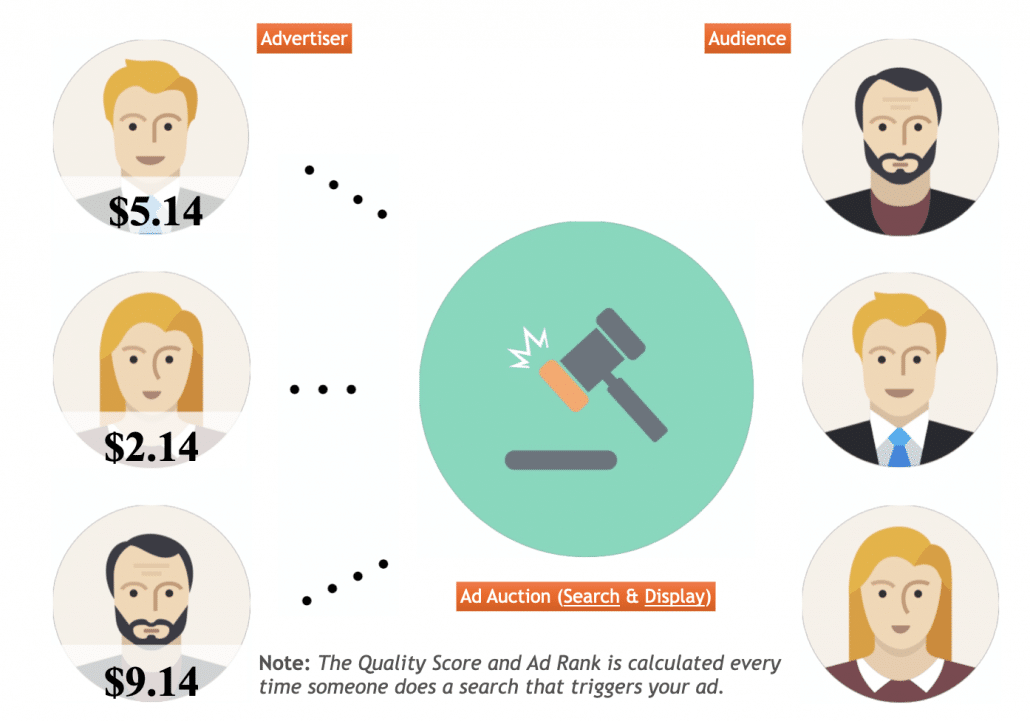
Advertisers usually kickstart their Google advertising campaigns by first identifying keywords or audiences they want to bid on and then decide on the maximum cost-per-click (CPC) that they are willing to spend.
Thereafter, they would key in their bids and enter an auction with other advertisers who are bidding on the same keywords or audiences, where the highest bidder will emerge as the champion.
Depending on the inventory type, the winner of the auction may appear in the top position or have their ad displayed in an ad unit as long as it’s above the Ad Rank Threshold.
To prevent a bidding war solely based on price, Google Ads factors in a quality score which is calculated every time someone does a search that triggers your ad.
Ad Rank
Definition of an Ad Rank
A crucial component to your Google advertising success, an Ad Rank determines whether your ad will appear on the page and if so, which position will it be at. For example, if Advertiser A’s ad rank is 20, and Advertiser B’s ad rank is 19, Advertiser A’s ad position would show above Advertiser B.
Max CPC Bid, Quality Score, & the Expected Impact from Ad Extensions and Format
Before we jump right into the formula, here are some terms that you have to understand – Max CPC Bid, Quality Score, and the Expected Impact from Ad Extension and Formats.
Max CPC Bid
A Max CPC Bid is the maximum amount that one is willing to pay for an ad to show and a higher bid would help show your ad on a higher ad position on the page.
Quality Score
Influenced by factors such as expected ad click-through rate (CTR), landing page experience, and ad relevance, a quality score is a score from 1 to 10 to target keywords, as well as an Ad’s CTR and quality of the landing page for Search Ads.
Expected Impact from Ad Extension and Formats
First introduced by Google in late 2018, the Expected Impact from Ad Extension and Formats works in such a way that if there are two ads competing against each other with the same bid and quality, the ad with a more positive expected impact from extensions will appear in a higher position than the other.
For example, if both Advertisements A and B have a bid of $1.75 and a quality score of 10 but the latter has a more positive impact from extensions, Advertisement B would rank higher than Advertisement A.
How is Ad Rank calculated?
Ad Rank is calculated by multiplying Max CPC Bid by Quality Score and adding the Expected Impact from Ad Extension and Formats.
For example, if an advertiser has a Max CPC Bid of $2.00 and a Quality Score of 10, their ad rank would be 20. Generally, the higher the Ad Rank, the higher the Ad position.
How does Ad Rank determine your CPC?
Definition of an Actual CPC
The Actual Cost-Per-Click (CPC) is the final amount that an advertiser is charged for a single click and often charges lesser than the Maximum Cost-Per-Click (Max. CPC) bid where one would be charged for just one single click.
How is Actual CPC calculated?
Actual CPC is calculated by taking the Ad Rank of the advertiser below you, divided by the quality score of the advertiser plus $0.01. As mentioned previously, Ad Rank is influenced by factors like the Maximum CPC and Quality Score.
For example, if the Ad Rank of the Advertiser below you is 20, and has a quality score of 10, your Actual CPC will be $2.01.

Structure of a Google Ads Account
This is a visualization of the Google Ads account structure with Property Listings and an Online Clothing Store as an example.
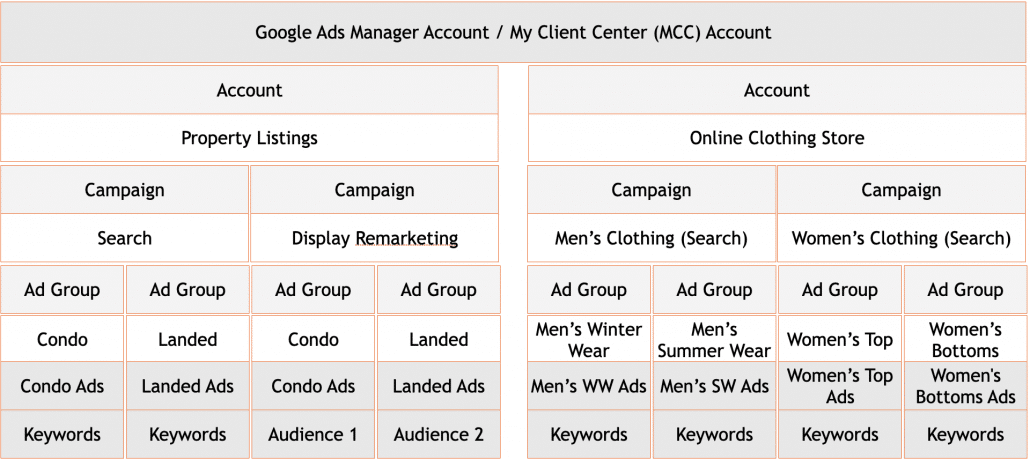
Let’s dive deeper into each of the components of the Google Ads account structure consisting of the Google Ads Manager Account, Account Level, Campaign Level, and the Ad Group Level.
Google Ads Manager Account

With the Google Ads Manager Account, one can easily view and manage multiple Google Ads accounts including other manager accounts from one single login and dashboard.
To put it simply, the Manager Account serves as an umbrella account to manage multiple campaigns effectively and is especially useful for digital agencies or individuals who manage several Google Ads accounts.
You can find out more about the Google Ads Manager Account here or learn about the User Access Levels for your Manager Account here.
Account Level

At the Account Level, one would be able to manage billing and payment settings, account access (adding and deleting users), linking accounts to other marketing assets, and more.
You can learn more about the Account Level here.
Campaign Level

The Campaign Level is where you can manage ad campaign settings like for instance, location targeting, bidding, and budget settings, select Google networks, and more.
A pro tip would be that you should create campaigns based on your website structure and group the campaigns according to the types of products or services.
Discover more about the Campaign Level here.
Ad Group Level

Lastly, the Ad Group level is where you can create multiple ad groups to break up keywords and ads into related themes, group similar keywords into the same ad group, create multiple ads within the same ad group to trigger on relevant search terms, and more.
You can do further reading on the Ad Group level here.
Campaign Setup – Search Campaigns
As promised, we will be guiding you through the steps of advertising on the Google Search Network. If you also want to find out how you can advertise through the Google Display Network (GDN), you may download this free Guide to Getting Start on Google Ads.
Sign Up for a Google Ads Account
Before you can start advertising on Google, the most important thing that you must own would be a Google Ads account. Here are the steps to creating one for yourself:
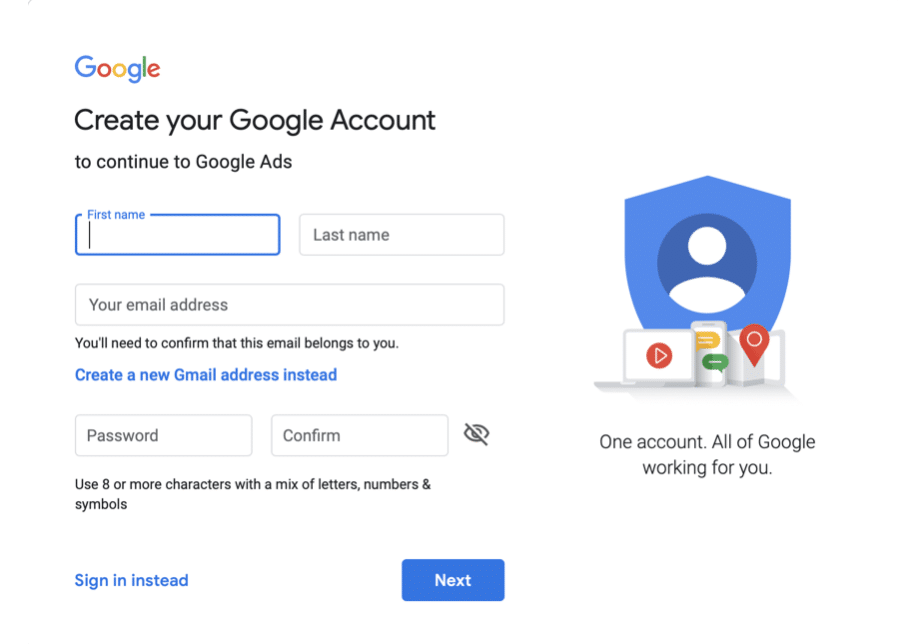
1) Own a Gmail Account
If you don’t already own a Gmail account, you have to sign up for one in order to start advertising on Google. You can choose to create a personal or business Gmail account.
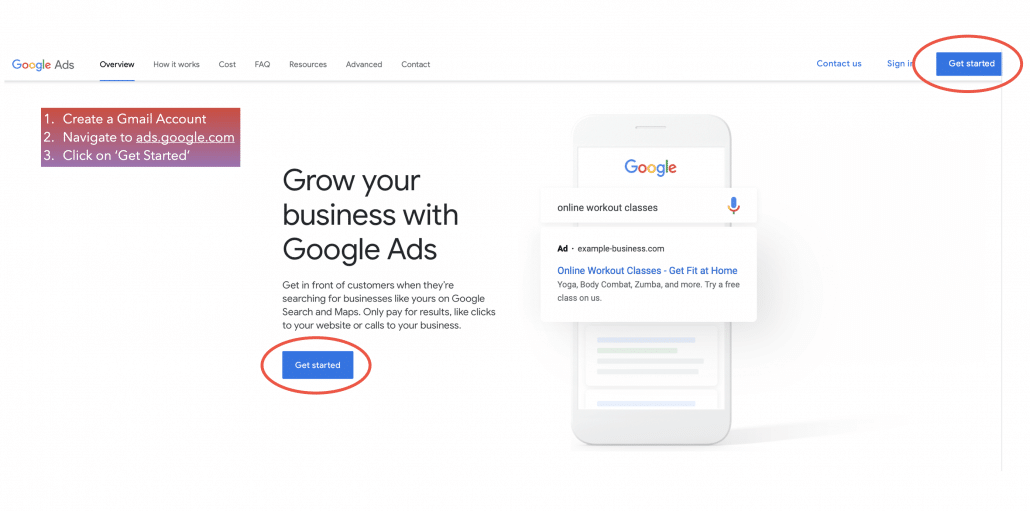
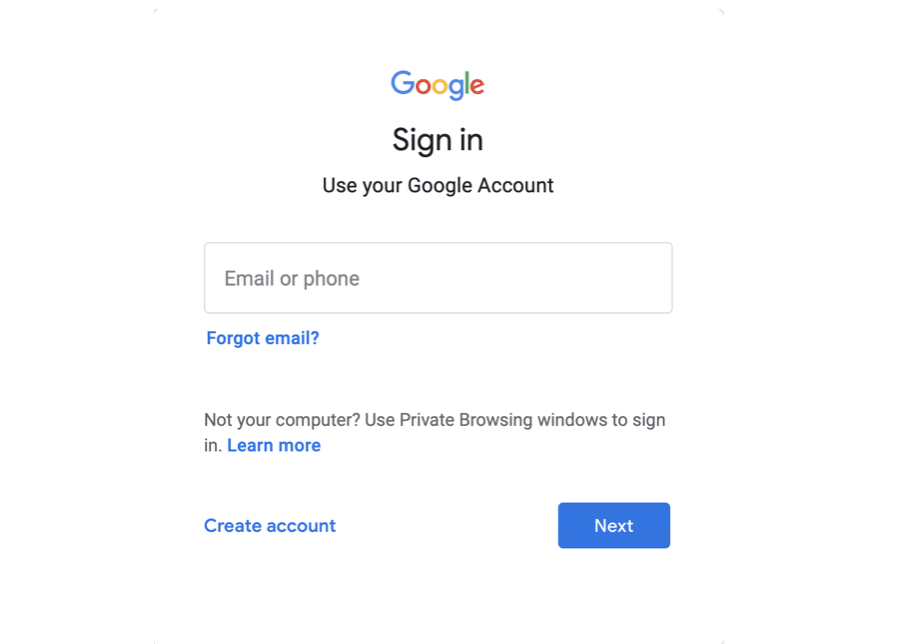
2) Navigate to Google Ads & Click on Start Now
Navigate to ads.google.com, click on ‘Get Started’, and sign in to your Gmail account to begin setting up your Google Ads account.
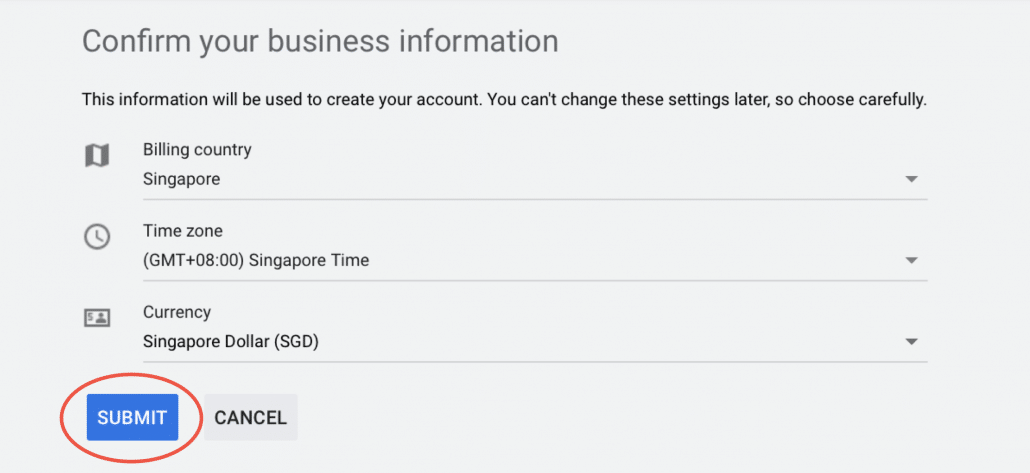
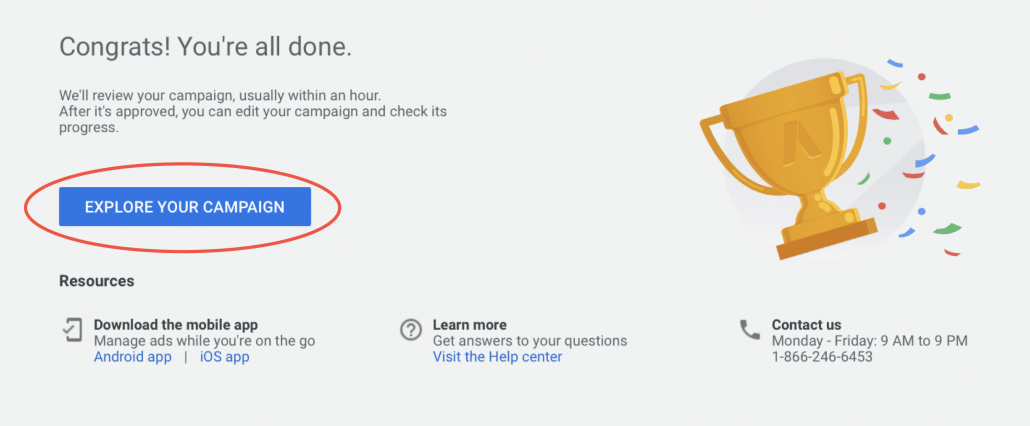
3) Set up your Google Ads Account
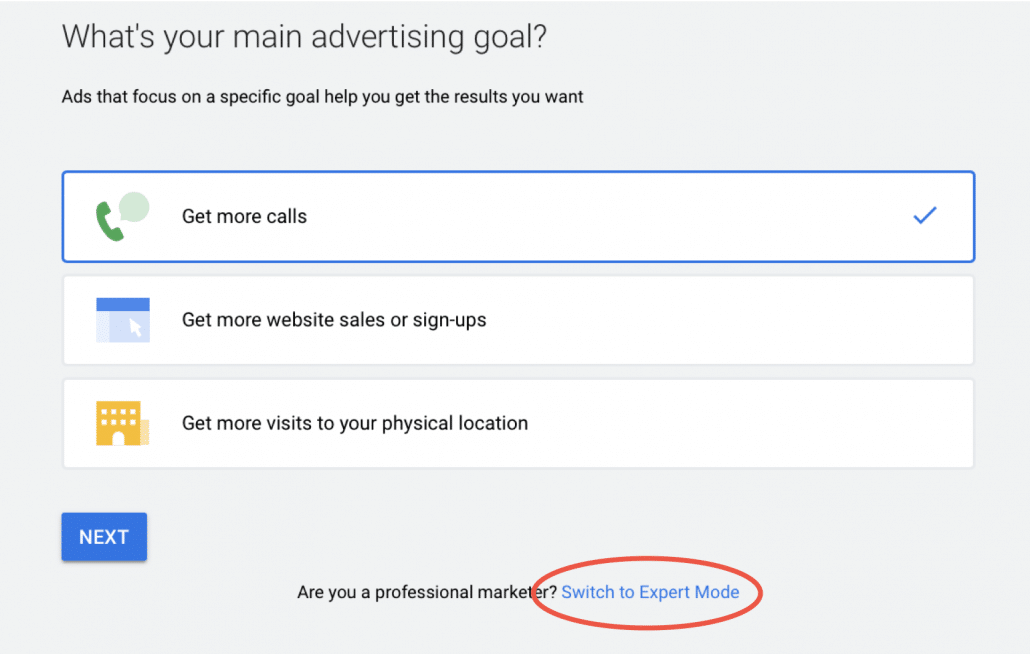
Before you can start creating campaigns and ads, you have to set up your Google Ads account where they will ask you a few questions regarding your business information and goals.
The following screengrabs will be to guide you on the setting up process of your Google Ads account.
Create a Search Ads Campaign
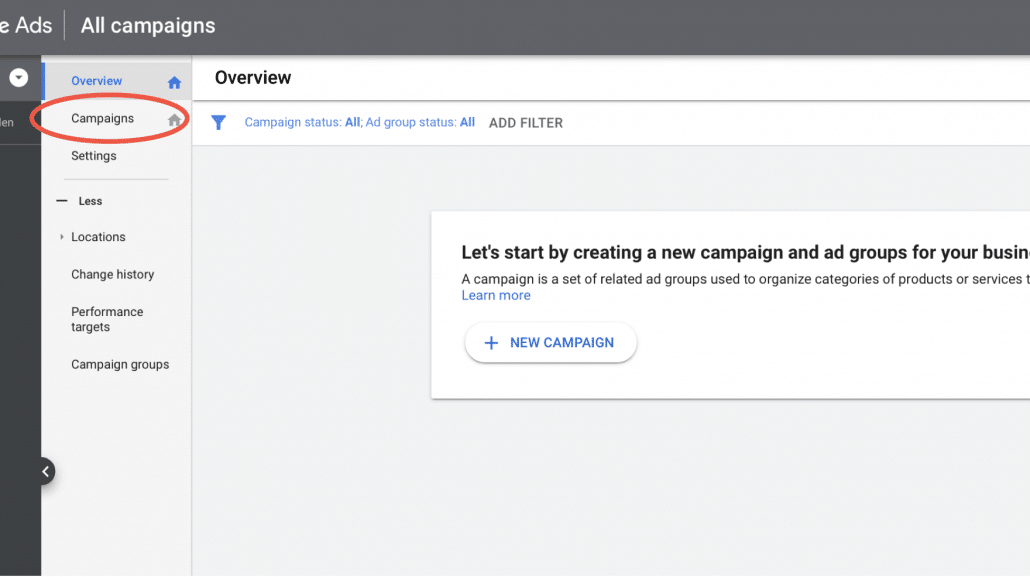
We will now create our very first Google search advertising campaign.
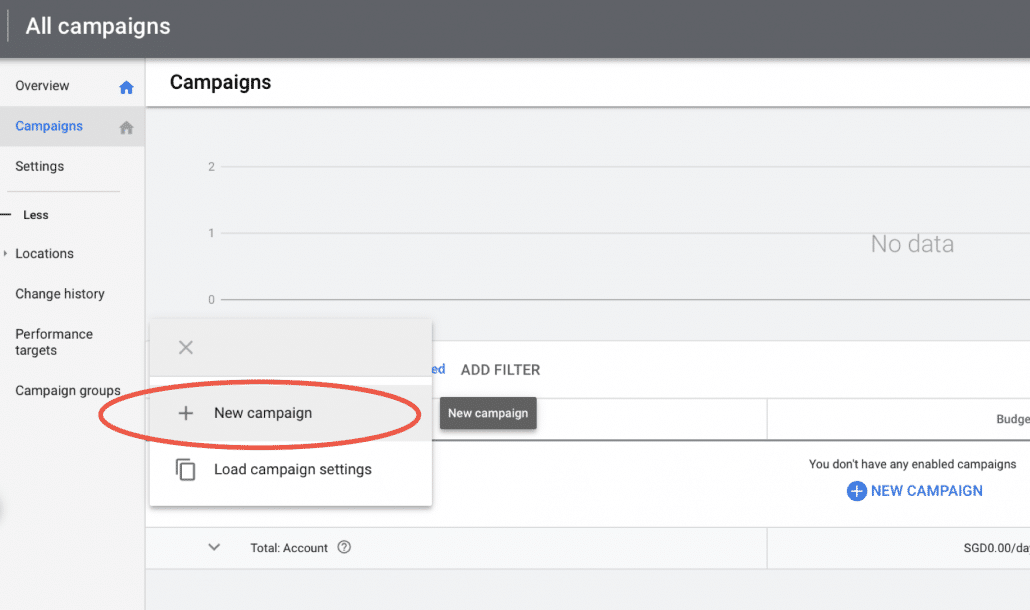
1) Creating Your First Search Campaign

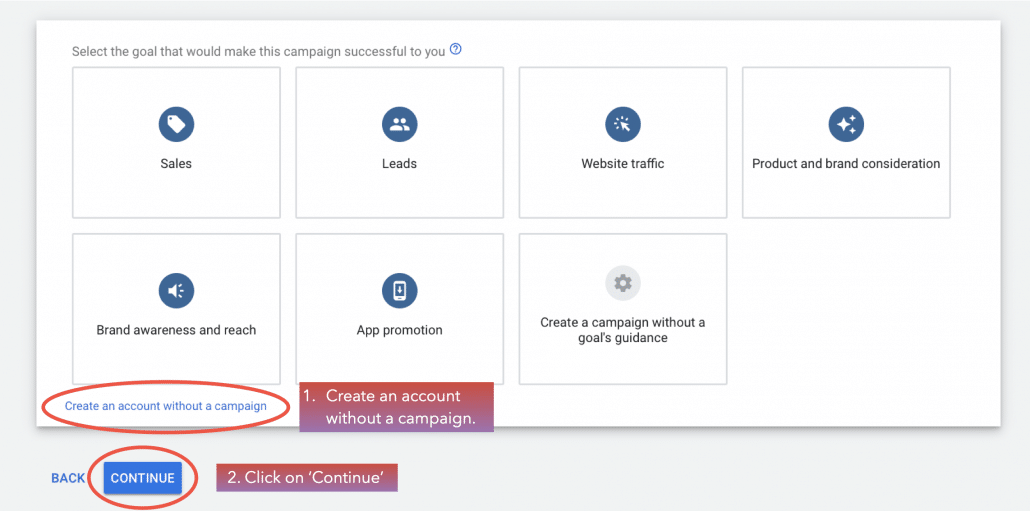
2) Setting Up Your Campaign – Campaign Goals
There are a total of 6 campaign goals for you to choose from. When selecting a goal, you will see suggested campaign settings on the following steps aimed at helping you to obtain that goal.
For every campaign that you create, you can only use one goal. Hence, do keep in mind that the goal that you choose should be the main thing you want to achieve for your business.
Here is an explanation of each campaign goal:
- Sales: Drive sales online, in-app, by phone, or in-store.
- Leads: Get leads and other conversions by encouraging customers to take action.
- Website Traffic: Get the right people to visit your website.
- Product & Brand Consideration: Encourage people to explore your products or services.
- Brand Awareness & Reach: Reach a broad audience and build awareness.
- App Promotion: Get more installs and interactions for your app.
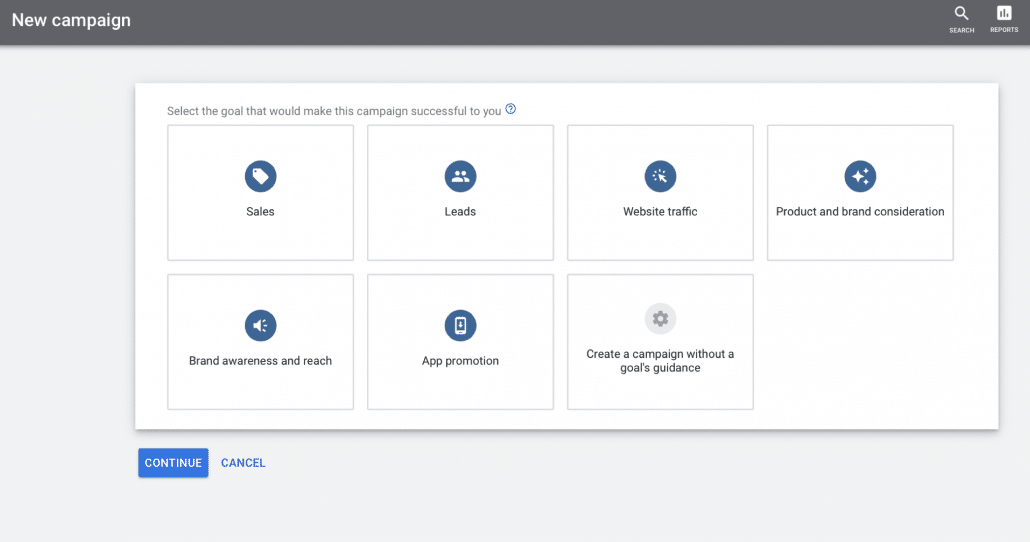
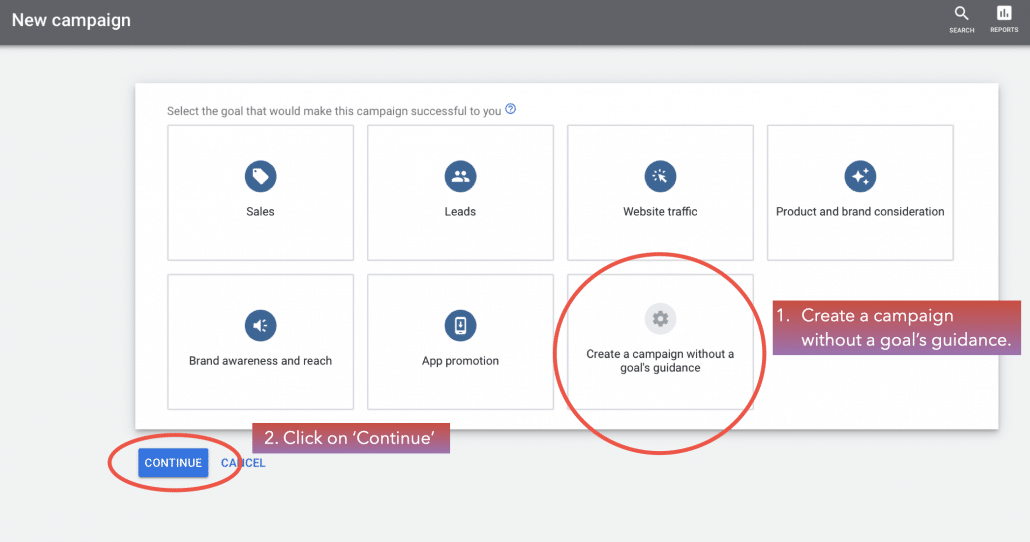
However, for the purpose of simplicity, we will create a campaign without a goal’s guidance.
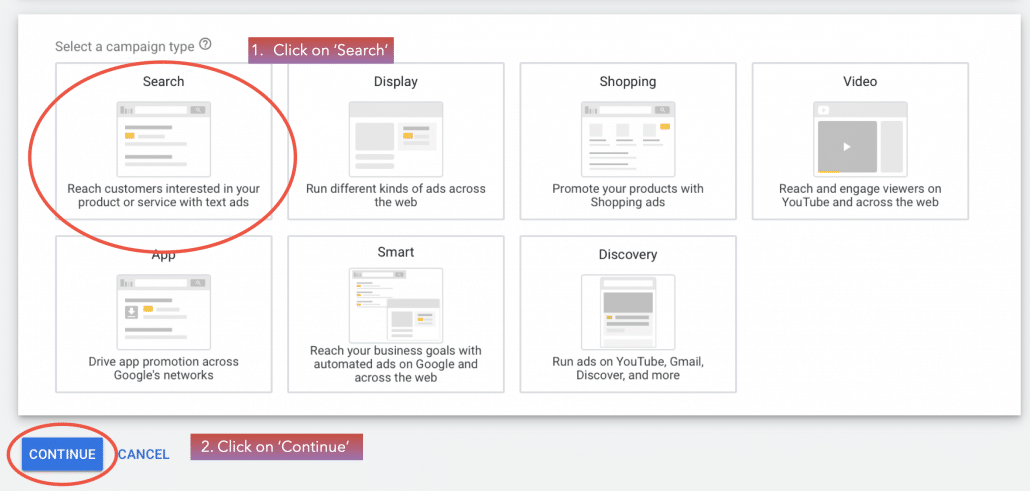
3) Setting Up Your Campaign – Campaign Types
There are 7 campaign types: Search, Display, Shopping, Video, App, Smart, and Discovery. The ‘Smart’ campaign type is only available on certain conditions. Find out more about the conditions here.
The explanation of each campaign type can be found as you hover over each one of them in Google Ads:
- Search: Allows brands to reach their audience who are searching on Google for the products and services they offer with text or call ads.
- Display: Create visually appealing ads that serve across the Google Display Network, on YouTube, and on mobile or in-app.
- Shopping: Create shopping ads that drive online and in-store sales, website clicks, and other conversions.
- Video: Create video ads that are designed to increase reach and awareness, encourage engagement, or drive conversions.
- App: Create app promotion ads that serve across the Google Search Network, Google Display Network, Google Play, within other apps, and on YouTube.
- Smart: Create text and image ads that show on Google, Google Maps, and across the web, and take advantage of minimal hands-on ads management.
- Discovery: Create visually rich, personalized ads that drive engagement with your brand across YouTube, Gmail, Discover, and more
Since we will be creating a search campaign, you can click on the ‘Search’ icon.
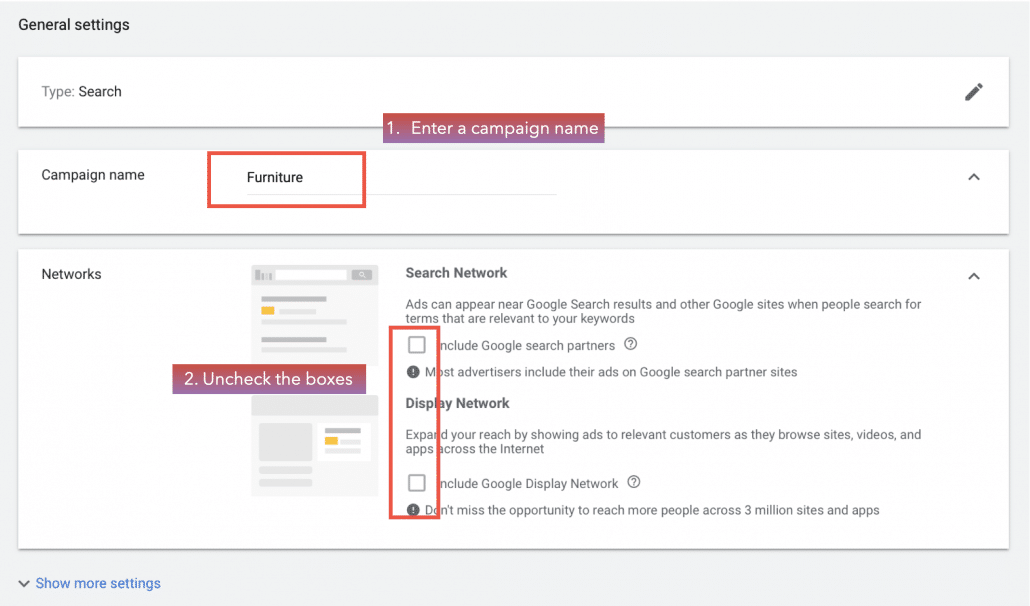
4) Setting Up Your Campaign – General Settings
There are two checkboxes under the ‘General Settings’ section – ‘Include Google search partners’ and ‘Include Google Display Network’.
Search Partners
Google Search Partners are sites in the search network who partner with Google to show ads. With search partners, the reach of Google Search ads can be extended to hundreds of non-Google websites, YouTube, and other Google sites.
Your ads will be able to appear on search results pages, site directory pages, or other pages that are related to a person’s search.
Display Network
With Display Expansion incorporated into your Search Network campaign, you will be able to reach consumers as they use Google search and visit sites across the web.
It may save you a lot of time in setting up two different campaigns but it is still better to manage the campaigns separately as you’ll have more control over each of them.
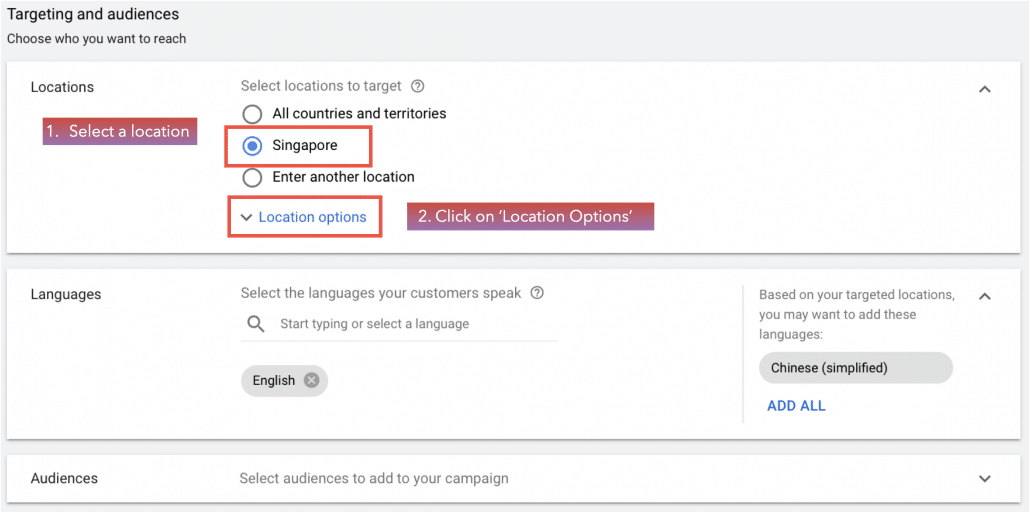
5) Setting Up Your Campaign – Targeting & Audiences
Location Targeting
The location targeting function in Google Ads allows one to target and/or exclude certain countries, territories, or regions to ensure that they are targeting the right audience. Google will then determine the location of these users via their IP address and device location.
To allow the most detailed level of reporting of performance and maximum control over budget and bidding, it would be best if you target only one location per campaign.
You are also able to target by bulk locations or radius targeting. Find out more about location targeting here.
Advanced Location Targeting Options – Target
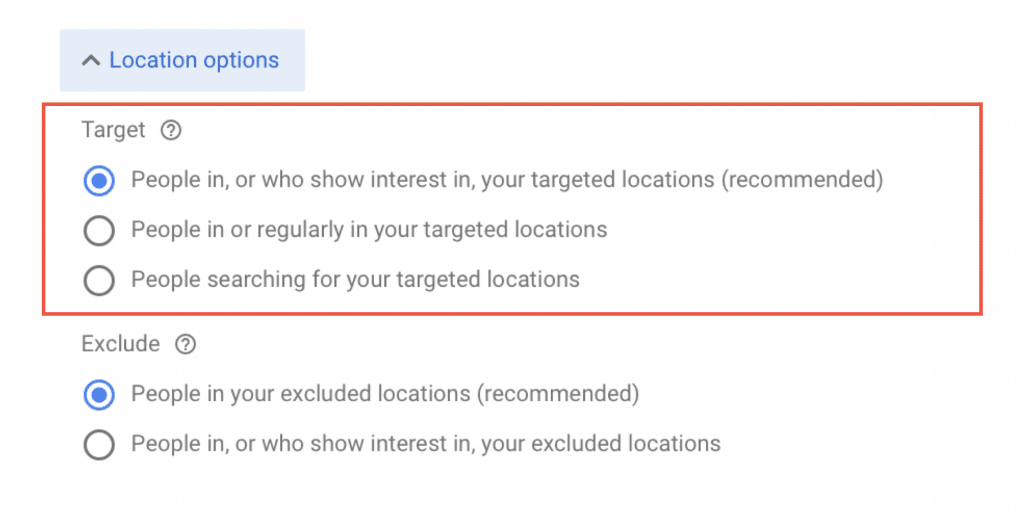
Reach people in, or who show interest in, your targeted locations
This default option is recommended and allows one to reach audiences who are in or are interested in the targeted locations. When this default setting is selected, your ads will be visible to people around the world, as long as they include the targeted location as a keyword in their searches.
Reach people in or who are regularly in your targeted locations
By choosing this option, your ads will be shown to people who are in or who are regularly in the targeted location. This means that it does not include people who searched for the targeted locations but is physically out of the targeted location at the time of the search.
Reach people who are searching for your targeted locations
Your ads will be visible to anyone who searches on Google for the targeted location and if they don’t specify a location in their search, the system will use their physical location, as determined by the IP address and device location, for targeting.
Advanced Location Targeting Options – Exclude
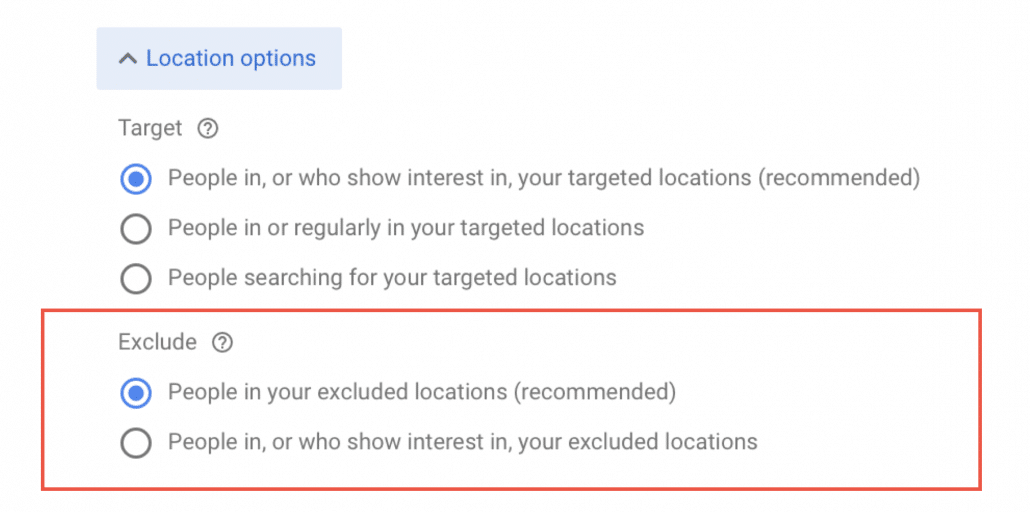
You will notice that by default, you will exclude only people who are located in your excluded location.
However, you can change your default setting to exclude people in or who show interest in your excluded locations.
Don’t show ads to people within your excluded locations
This option keeps your ads from appearing to people who are in excluded locations which means that people who are out of the excluded locations will still be able to see the ads.
Don’t show ads to people in, or who show interest in, your excluded locations
If this option is selected, Google will not show your ads to people who are located in or shows interest in your excluded locations.
For this guide, we will select people who are in or are regularly in your targeted locations.

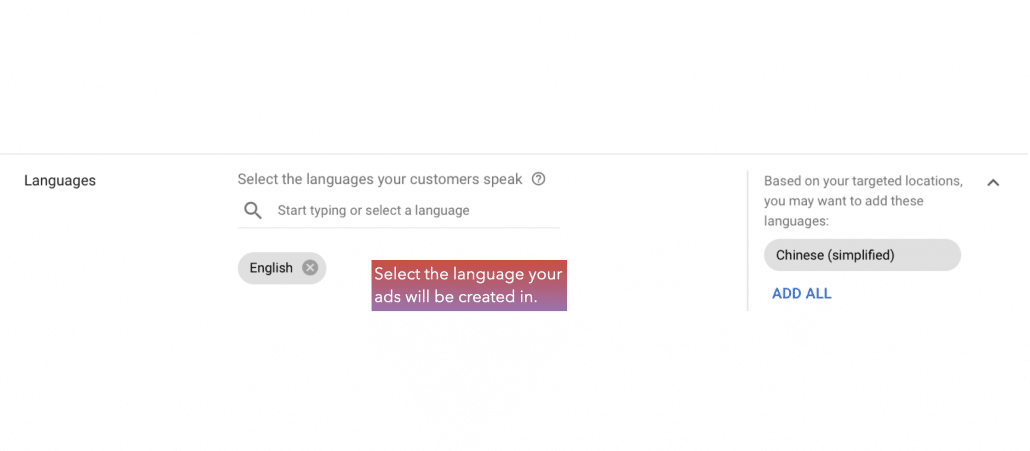
Language
Google will detect languages based on Google Domain (google.fr, google.cn, etc), Google Interface Language Setting, Search Query (in local language), and Recently viewed pages (for Display Ads).
Audiences
The ‘Browse’ option under audiences allows one to choose their target audiences based on the following:
- Detailed Demographics: Parental Status, Marital Status, Education, Home Ownership, etc.
- Affinity: The interests and habits of your target audience.
- In-market: Based on a user’s search and browsing history.
- Remarketing and similar audiences: Based on past visitors to your site.
- Combined Audiences: Allows you to combine your audiences to better define your ideal audience.
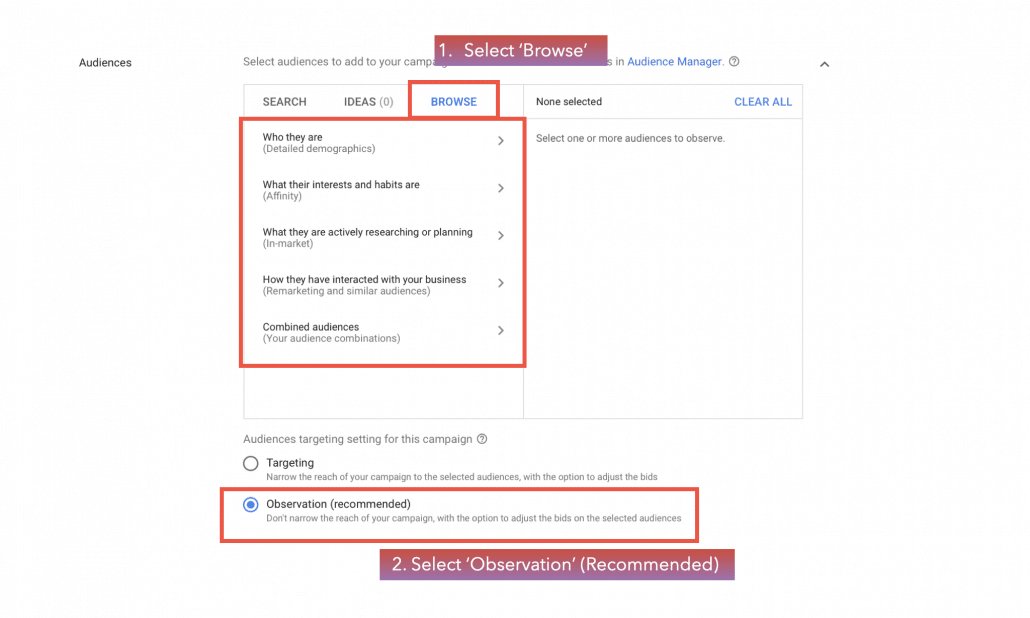
As for the ‘Audience targeting setting for this campaign’, it is advisable to start with ‘Observation’ first to understand the effectiveness of your selected audience. Once you have the data to inform you that it is effective, you can change the option to ‘Targeting’.
6) Setting Up Your Campaign – Budget & Bidding
Daily Budget
Your campaign’s daily budget can be used up to 2 times to show your ads on certain days of the week or times of the month based on fluctuations in traffic – but not more than what you spend on your campaigns each month.
This simply means that as long as your budget is consistent for an entire month, you will not be charged more than your daily budget multiplied by the average number of days in a month, which is 30.4 (365 days in a year divided by 12 months).
However, you will still only be charged up to 2 times your daily budget. For instance, if your daily budget is US$10 and you have accumulated $23 in costs on a given day, you will only be charged $20 per day. The remaining $3 is returned to you as an over-delivery credit, which will be visible in your transaction history.
Calculate Based on Your Average Cost-Per-Click (CPC).
You are allowed to choose a daily budget for each campaign based on your advertising goals.
You can figure out your daily budget by multiplying the clicks per day to the cost-per-click. For example, if your CPC is $0.10 on average, and you would get around 500 clicks per day, your budget will be $50 per day.
You can read more about the budget here.
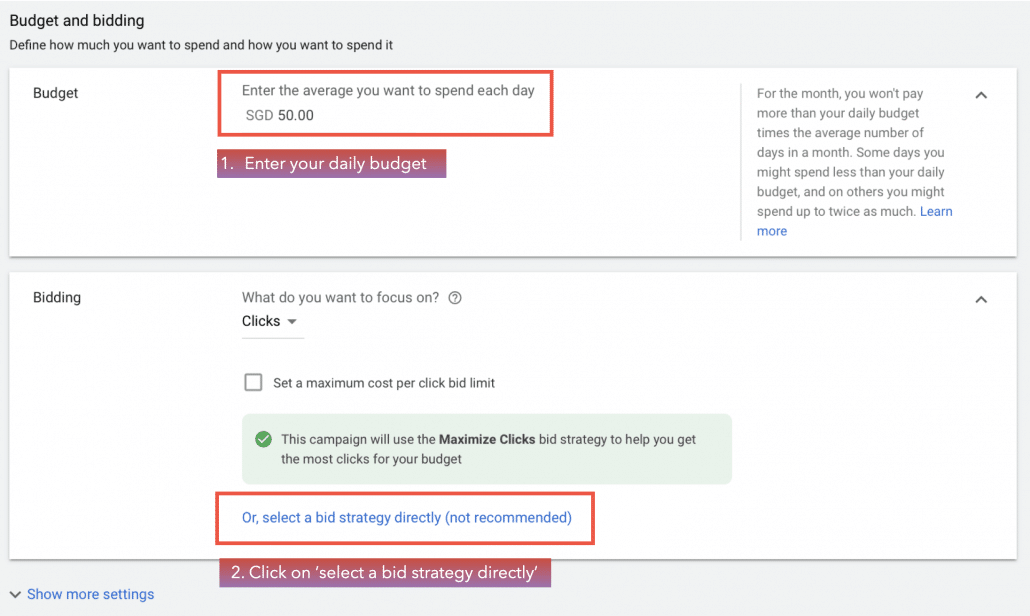
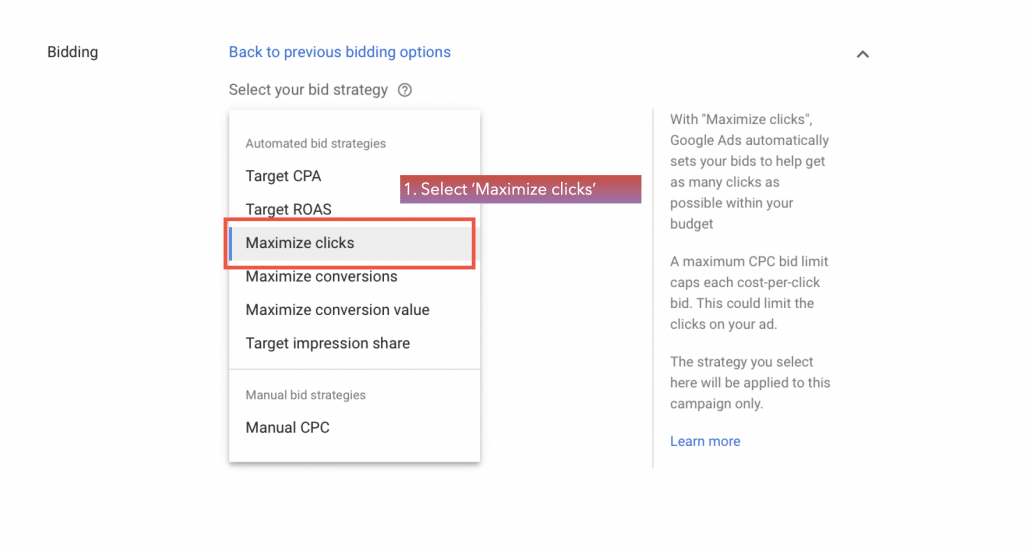
Bidding
There are a total of 6 automated bid strategies in Google Ads:
- Target CPA: Bids are automatically set to help get as many conversions as possible at the target cost-per-acquisition (CPA) you set. Some conversions may cost more or less than your target.
- Target ROAS: Bids are automatically set to help get as much conversion value as possible at the target return on ad spend (ROAS) you set. Some conversions may have higher or lower returns than your target.
- Maximize Clicks: Bids are automatically set to help get as many clicks as possible within your budget. A maximum CPC bid limit caps each cost-per-click bid. This could limit the clicks on your ad.
- Maximize Conversions: Bids are automatically set to help get the most conversions within your budget.
- Maximize Conversion Value: Bids are automatically set to help get the most conversion value within your budget.
- Target Impression Share: Bids are automatically set to increase the chances of your ads of appearing in the search page area you select.
It is recommended to select ‘Maximise clicks’ in the early stages of your campaign as you are in the experimental stage and have very little data to try other options such as ‘Target CPA’.
7) Setting Up Your Campaign – Set Up Ad Groups
An ad group is where you create ads and match them to keywords that will be triggered when they match search terms entered by search engine users.
There are a few types of keyword modifiers to ensure your ad does not show up when someone types something irrelevant. To understand each keyword modifier better, click here.

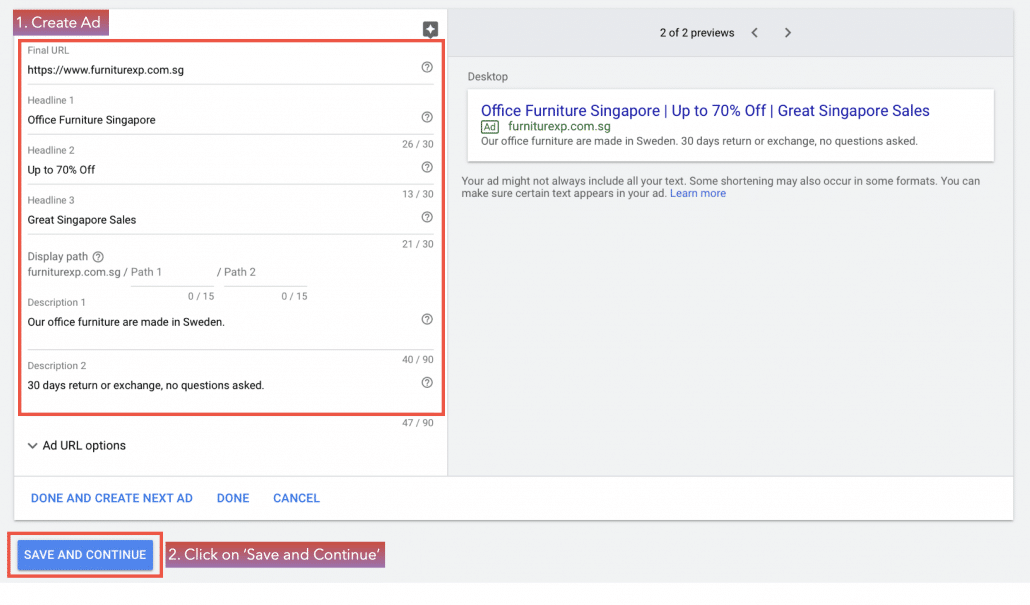
8) Create Ads
This section is where you will be creating your very own ads. Here is an explanation of each of the functions under ‘New text ad’.
- Final URL: The URL of the page that you want to send your visitors to.
- Display Path: Additional texts that you can use to make your copy more enticing. It does not alter the final URL that the visitors land on after clicking on the ad.
- Headlines & Descriptions: Where you enter your main ad copy. Headlines only allow 30 characters whereas Descriptions allow 90 characters.
Do take note that Headline 3 and Description 2 may not always show. Hence, do ensure that the most important information is in Headline 1 and 2, and Description 1. You can preview your ads through Karooya’s Expanded Text Ad Preview Tool.
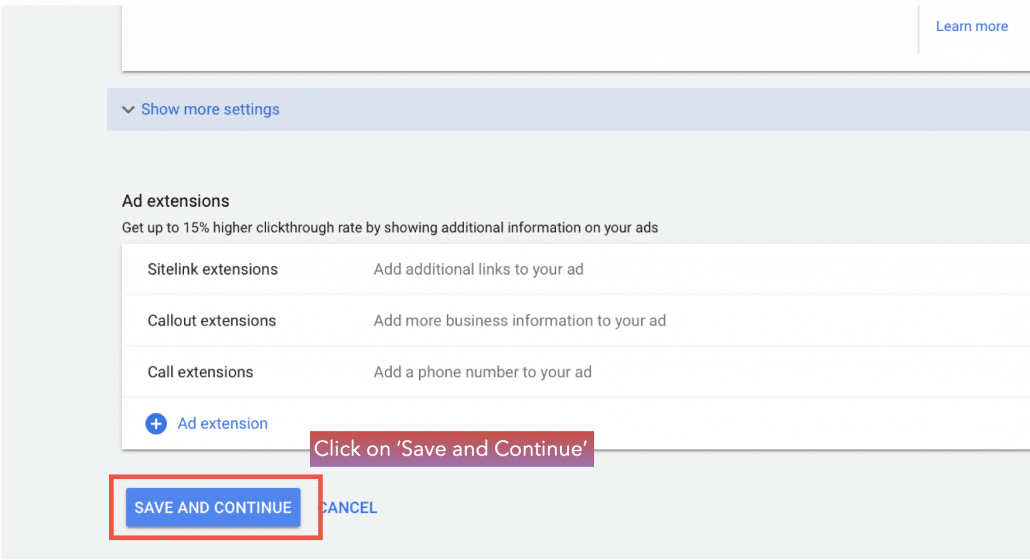
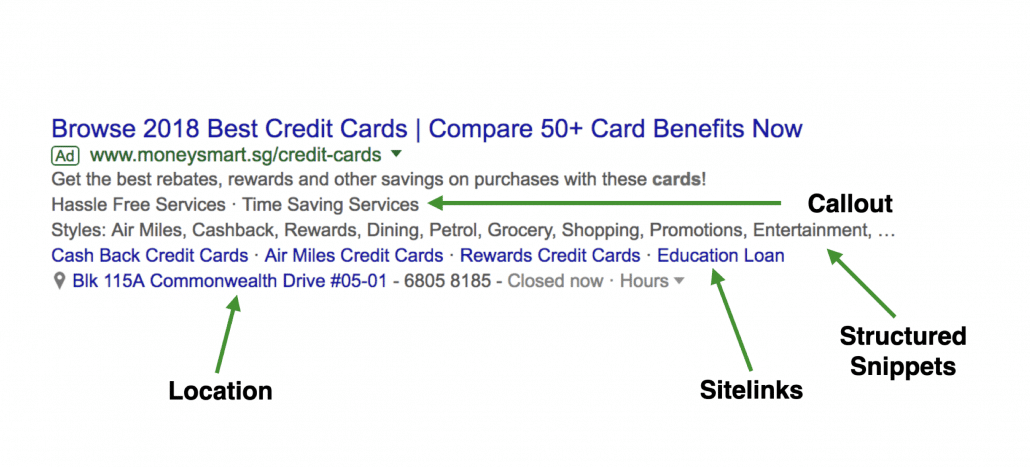
Create a Search Ads Extension
Now that you have created your Search Ads Campaign, we will be teaching you how you can create a Search Ads Extension to make your ads stand out better and increase your click-through rates.
Find out more about Search Ads Extension here.
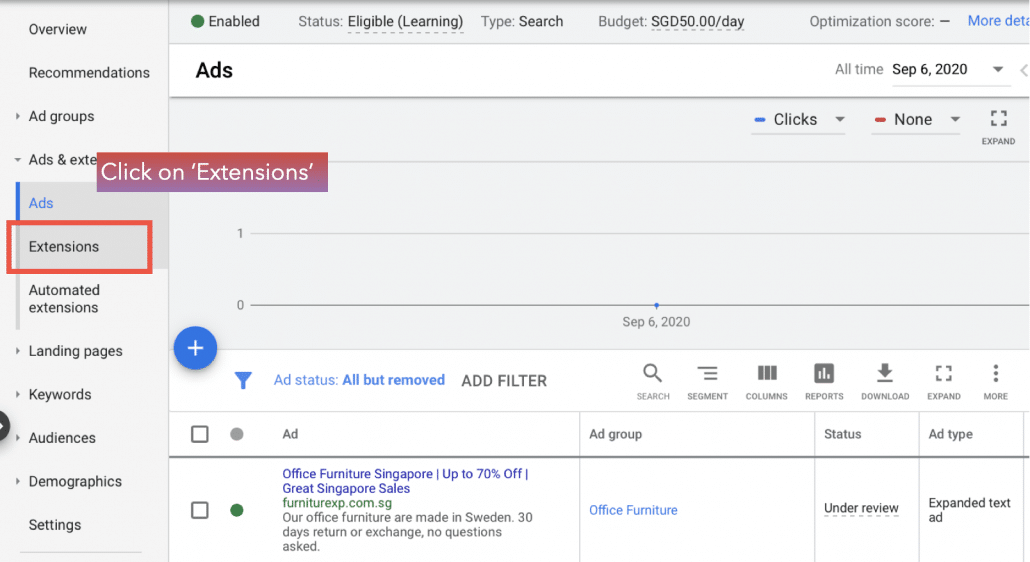
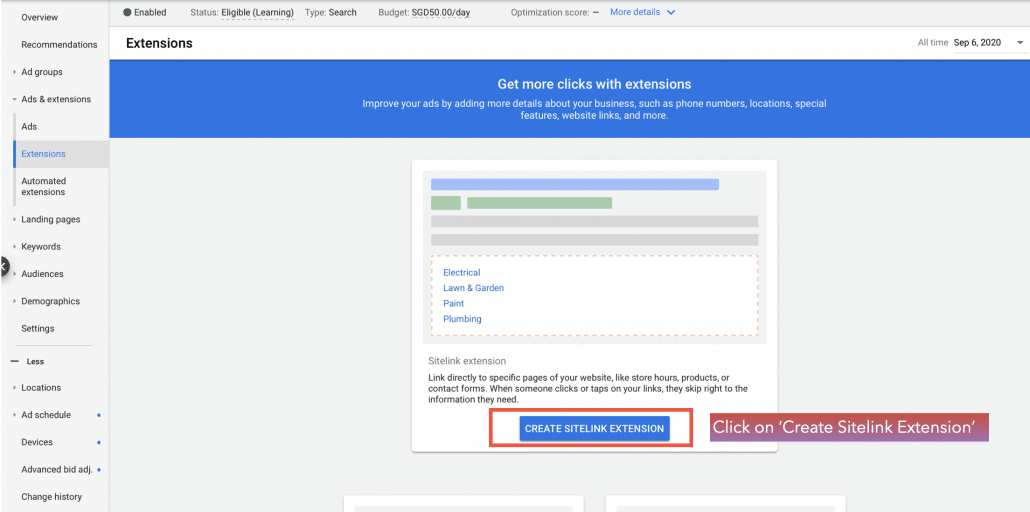
Creating Your Search Ads Extension
The following screengrabs will guide you through the Search Ads Extension creation.
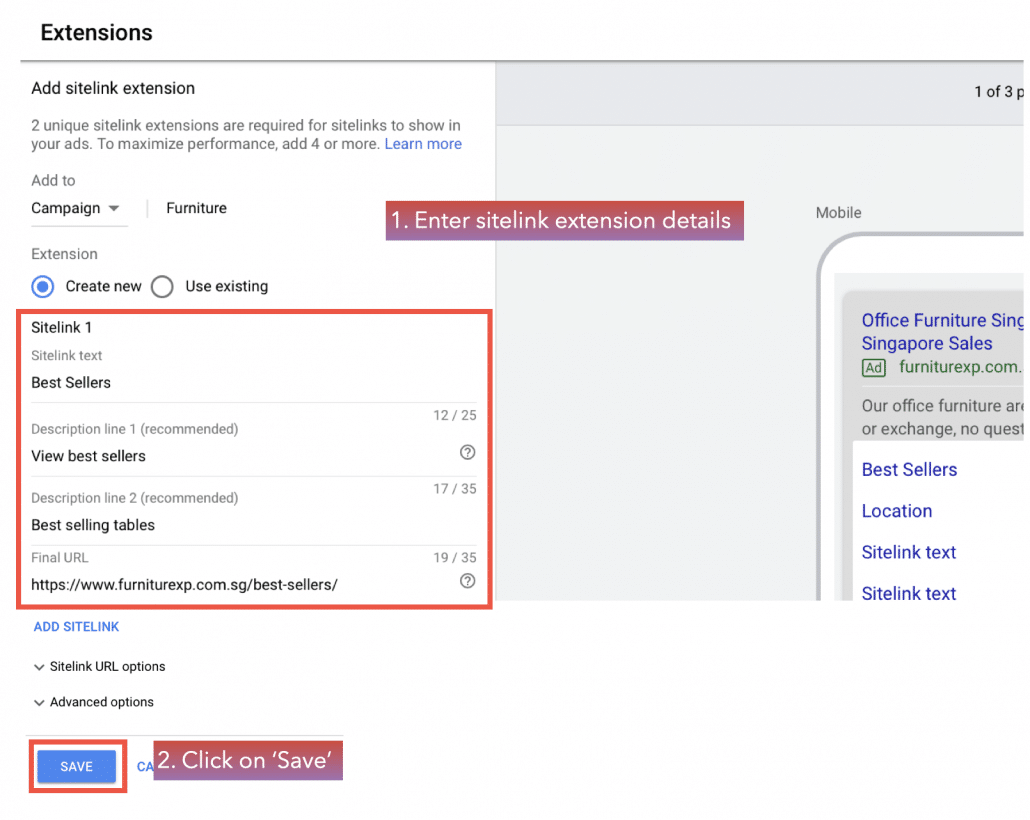
If you want to create sitelink extensions based on your goals, you can find out more about Ad Extension Goals here. Some of the goals include getting customers to convert on your website, get people to download your app, and more.
Conduct Keyword Research
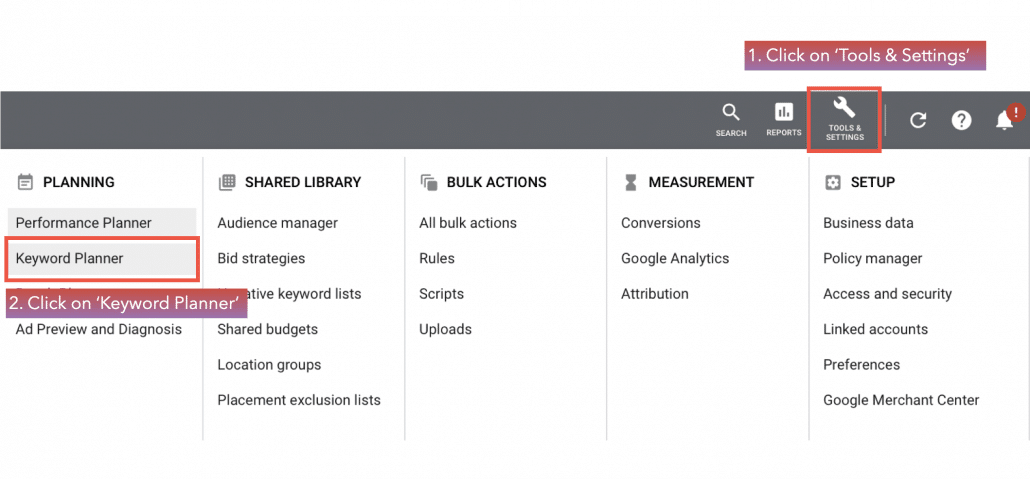
You can conduct keyword research within Google Ads with the Keyword Planner tool that can be found under ‘Tools & Settings’.
The Keyword Planner tool allows you to search for keyword ideas, as well as analyze the average monthly search volume (the amount of traffic potential the keywords have), competition, and estimate the cost-per-click bid range of your keyword ideas.
Google Keyword Planner
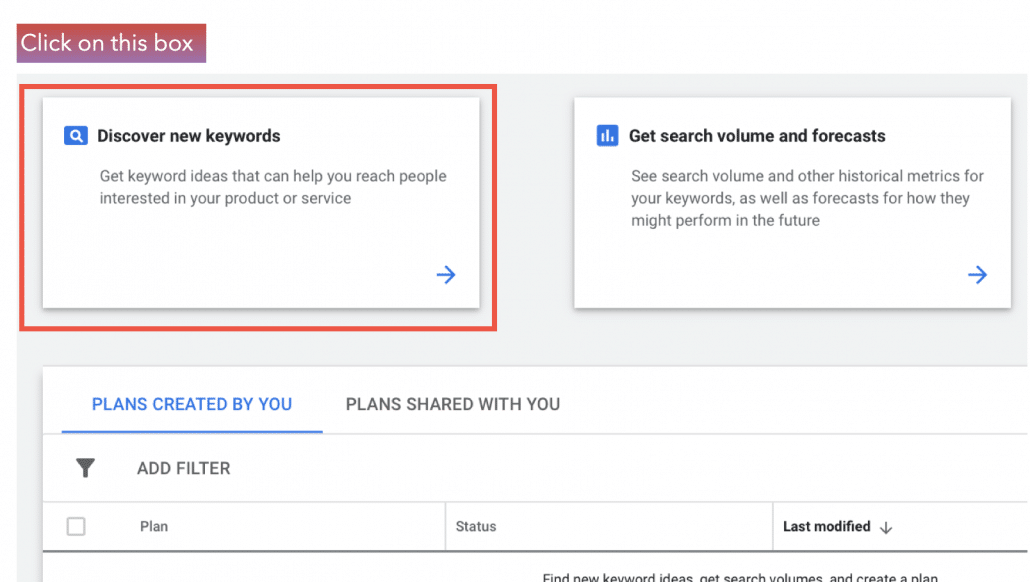
1) Go to Google Keyword Planner
2) Click on ‘Discover new keywords’
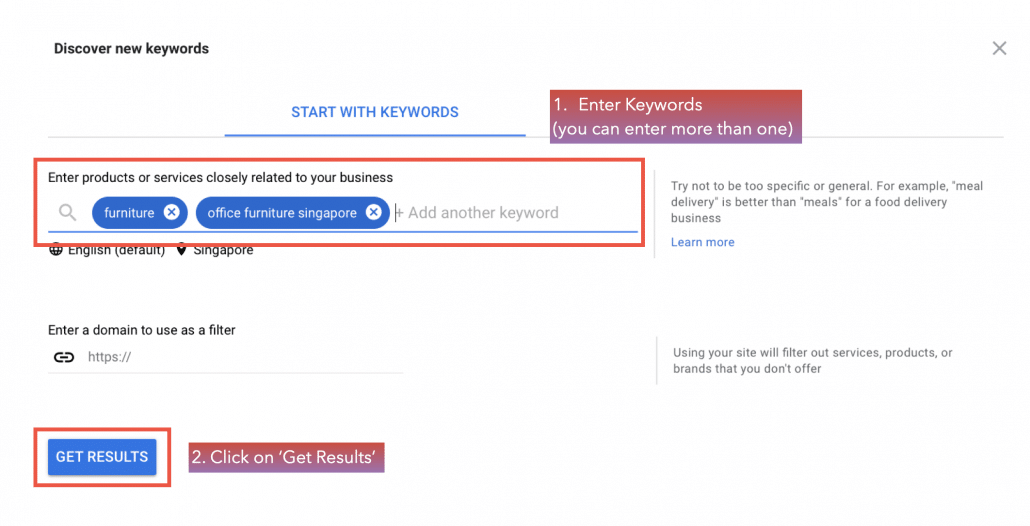
3) Enter Your Keywords
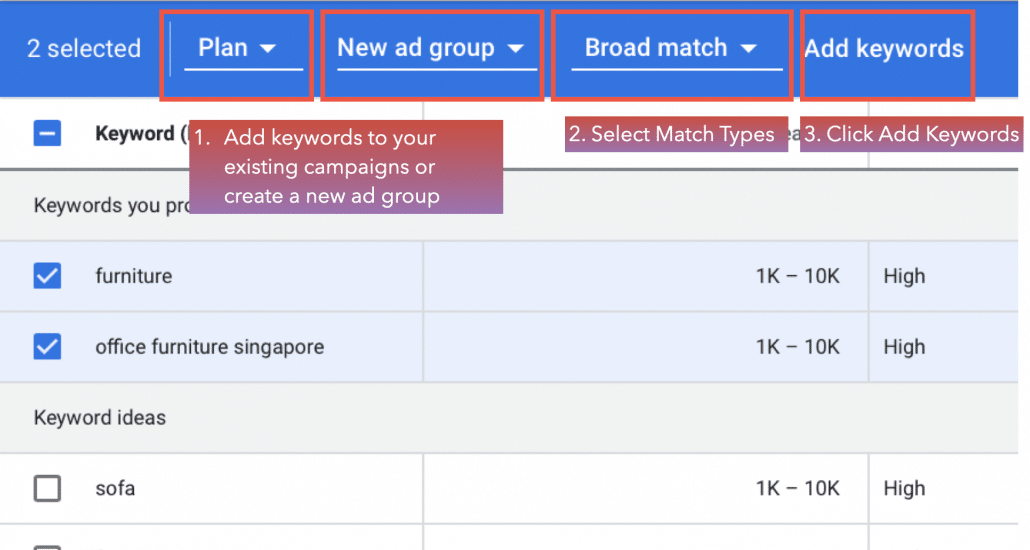
4) Add the keywords to your Ad Group

Understanding Keyword Match Types
Below is a table that explains how keyword match types work. You can read more about Keyword Match Types here.
|
Keyword & Match Types |
Ads May Show for Search Terms Such As… |
Ads May Not Show for Search |
Rationale |
|
digital marketing courses |
|
|
Your ads may appear as long as one term within your keyword is matched. |
|
+digital +marketing +courses |
|
|
Search terms may appear in any order as long as the term immediately after the ‘+’ sign is present. Additional words may appear anywhere before and after these terms. |
|
“digital marketing courses” |
|
|
Ads won’t show if a word that changes the meaning of the phrase is added in between the phrase. Close variants apply. |
|
[digital marketing courses] |
|
|
Close variants may appear in any order and additional words may appear as long as the meaning is not changed. |
Same-meaning Close Variants
Below is a table that explains how Same-meaning Close Variants work. You can read more about Same-meaning Close Variants here.
|
Keyword & Match Types |
Ads May Show For Search Terms Such As… |
Rationale |
|
“digital marketing courses” |
|
Word order will still be respected in same-meaning queries. |
|
+digital +marketing +courses |
|
Google may be a little more liberal with interpreting the “same-meaning” as opposed to the phrase match example. |
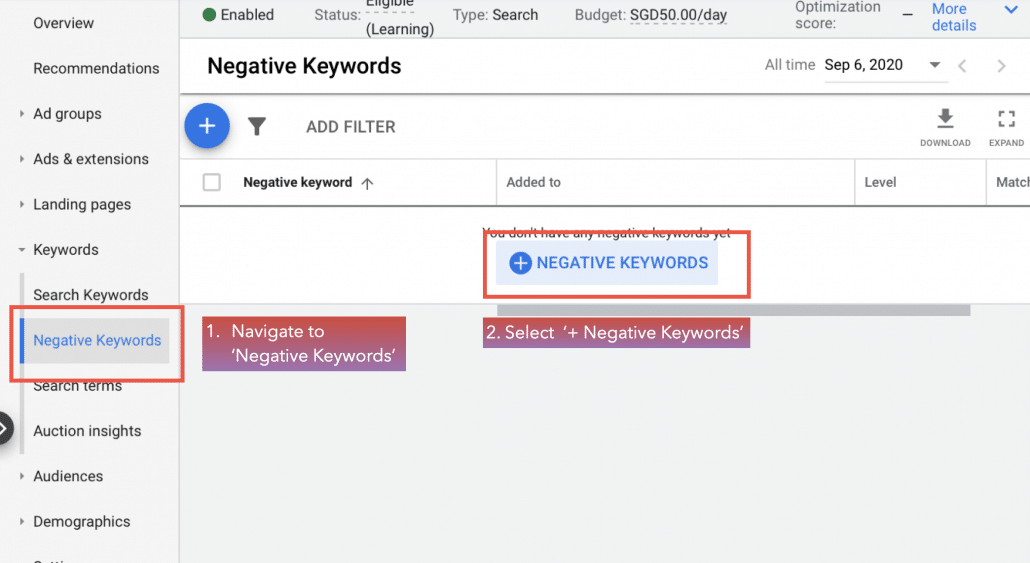
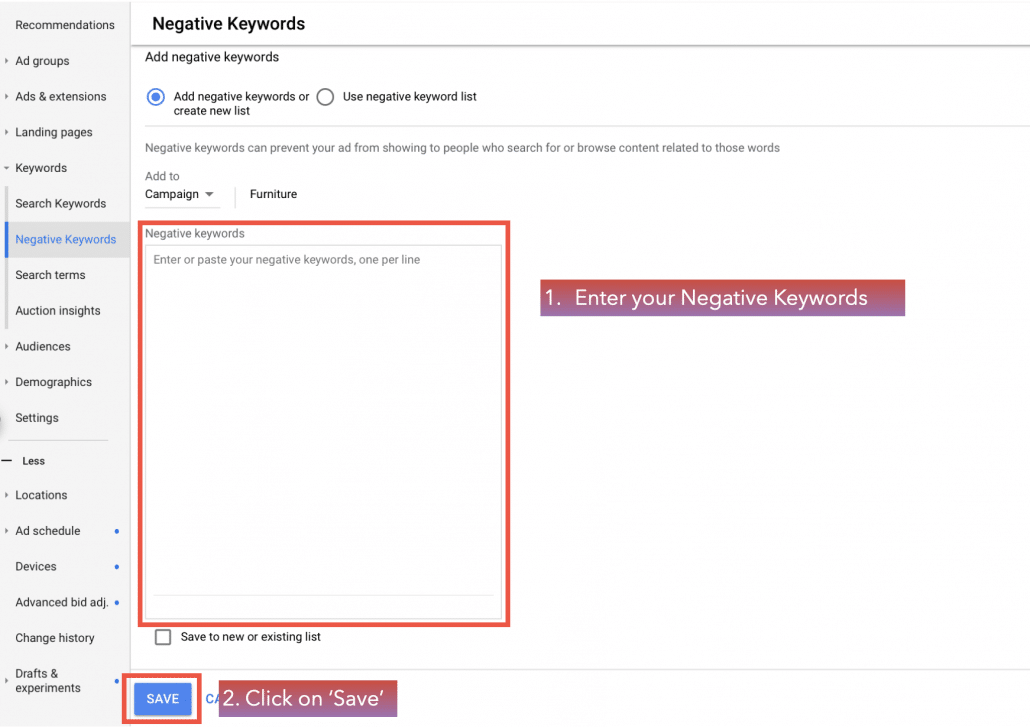
Adding Negative Keywords
When a negative keyword is added into an ad group within a search campaign, the ad will not show if the negative keyword appears in a user’s search query. Negative keywords help in eliminating irrelevant ad impressions and reduces the number of irrelevant clicks.
You can also apply keyword match types to negative keywords as well. Some of the match types that you can apply include Negative Broad Match, Negative Phrase Match, Negative Exact Match, and Symbols in Negative Keywords. Find out more about Negative Keywords here.
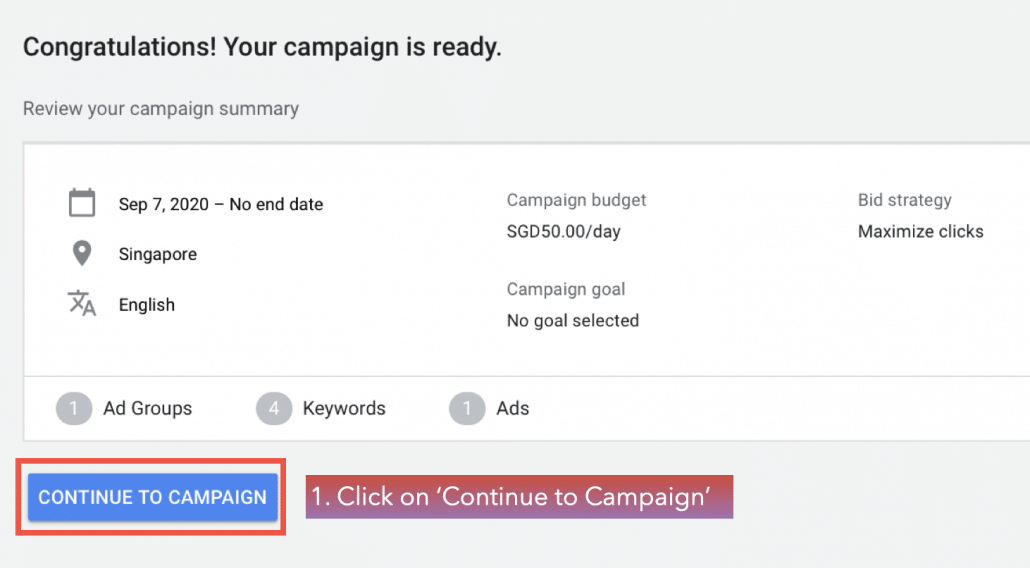
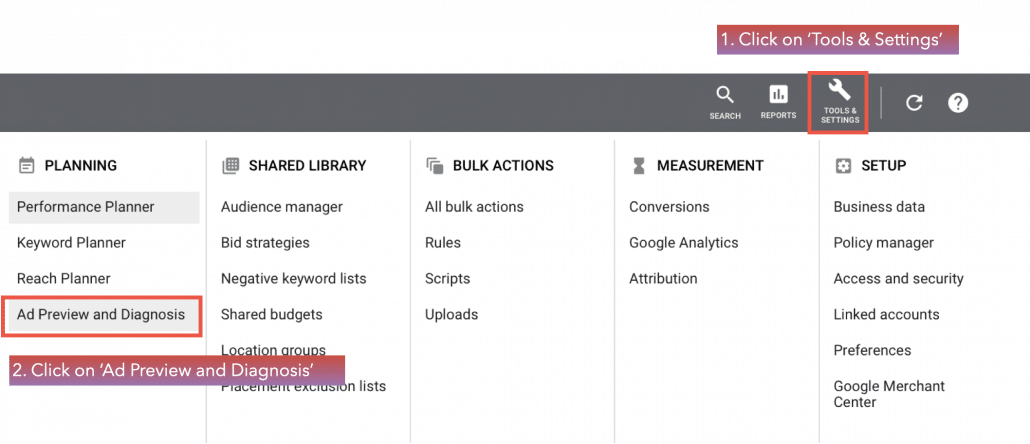
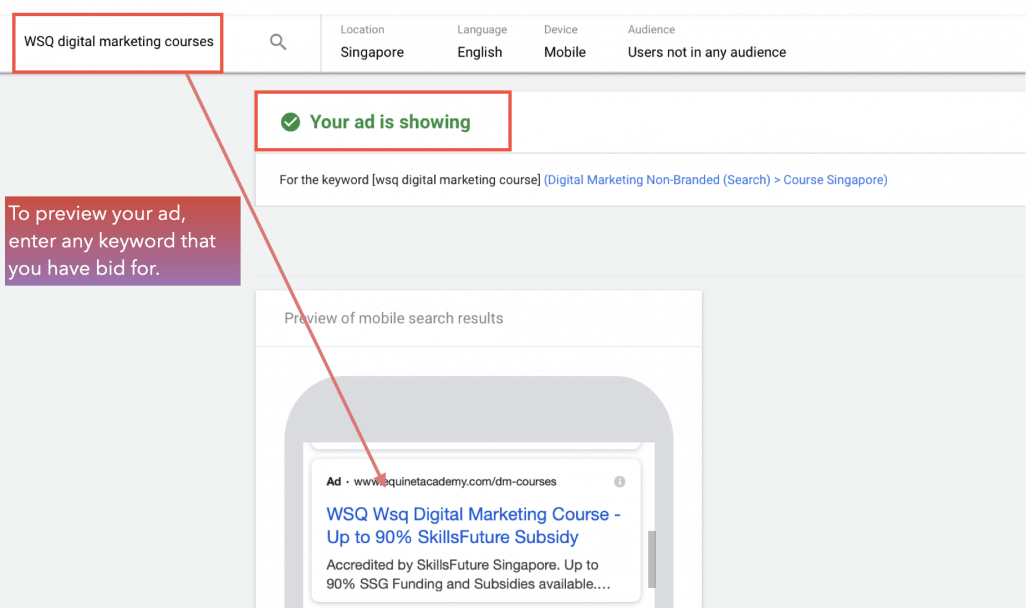
Previewing Your Search Ad
Congratulations on successfully creating your search campaign and ad. You can preview it with the ‘Ad Preview and Diagnosis’ tool under ‘Tools & Settings’ in Google Ads.
Interested in advertising on the Google Display Network (GDN)? Download our free e-book today!
We hope that you found this article useful and are able to successfully create your first Google Search ad campaign.
Want to learn more about Google Ads and how you can advertise on the Google Display Network (GDN)? You can download our free ebook, ‘How to Start Advertising on Google 2020’, where we will be sharing more on both Google Search and Display Ads.
Ready To Learn In-Depth?
Ready to learn in-depth and hands-on?
In our 3-day comprehensive and hands-on Google Ads (AdWords), Search (SEM), & Display (PPC) Certification Course, you will learn step-by-step on how to develop a Google search and display advertising strategy and get a chance to create campaigns that will help you to effectively generate leads, sales, and web traffic.